a. Remove screws securing idle stop solenoid bracket to float bowl and remove solenoid and bracket assembly.
NOTE: If solenoid replacement is necessary, bend back retaining tabs on lockwasher; then remove large idle stop solenoid nut and remove solenoid from bracket.
CAUTION: The idle stop solenoid should not be immersed in any type of carburetor cleaner and should always be removed before complete overhaul.
7. If used, remove retaining clip from the vacuum break rod at the vacuum diaphragm plunger and remove other end of rod from dashpot lever on end of the air valve shaft.
NOTE: On some models, the vacuum break rod is clipless, so it will be necessary to remove during air horn removal (See step 10).
8. Remove secondary metering rods from secondary wells by removing small screw in the secondary metering rod holder. Lift rods and holder as an assembly from carburetor. Metering rods may be disassembled from the hanger by rotating ends out of the holes in the end of the hanger.
9. Remove (9) air horn to bowl attaching screws; (2) attaching screws are located next to the primary venturi. ([2] long screws, [5] short screws, [2] countersunk screws.)
NOTE: Some models have a secondary baffle plate mounted under the (2) center air horn attaching screws next to the secondary bores. The baffle can be removed also at this time. Other models have a secondary air valve lockout shield located over the lockout lever. This is held in place by the air horn screw next to the lockout lever and a small attaching screw. (Check the "C" parts bulletin in the Delco Carburetor Parts and Service Manual 9X for correct usage of these extra parts.)
10. Remove air horn by lifting straight up. If the clipless vacuum break rod is used, rotate air horn to remove vacuum break rod from dashpot lever on the end of the air valve shaft. Air horn gasket should remain on bowl for removal later.
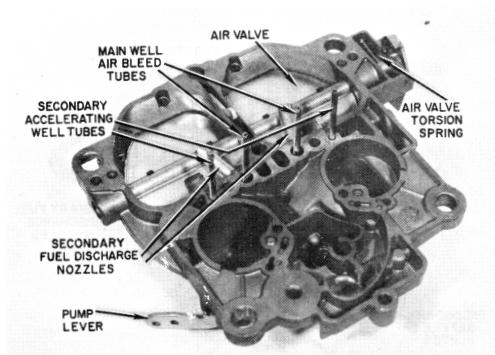
CAUTION: Place air horn inverted on clean bench. Care must be taken not to bend the small bleed tubes, accelerating well tubes, and pull-over enrichment tubes in air horn casting. These small tubes protrude from the air horn casting and are permanently pressed in place. DO NOT REMOVE.
FIGURE 28
AIR HORN DISASSEMBLY - (Figure 28)
1. (Early Models) Remove end of dashpot plunger rod from air valve lever. Some slide out of lever and others are held by a retaining clip. The dashpot piston has a synthetic seal inside the piston on the plunger shaft. This should not be immersed in carburetor cleaner as the seal will be destroyed. Clean in a stoddard solvent or kerosene.
NOTE: Further disassembly of the air horn is not required for cleaning purposes. If part replacement is required, proceed as follows.
2. Remove staking on (2) choke valve attaching screws, then remove choke valve and shaft from air horn.
3. If the air horn is equipped with the air valve lockout
and it needs replacement, remove the lockout lever by
driving out roll pin with small drift punch.
NOTE: Air valves and air valve shaft should not be removed. However, if it is necessary to replace the air valve closing spring or center plastic eccentric cam, a repair kit is available. (Refer to the "C" Parts Bulletin in the Delco Carburetor Parts and Service Manual for part number application.)
To replace the air valve spring or eccentric cam, proceed as follows:
A. Remove air valve spring fulcrum pin lock screw.
B. Remove air valve spring fulcrum pin from casting. C. Remove air valve spring.
D. Remove (4) air valve attaching screws and remove
valves from shaft.
E. Remove air valve shaft by sliding out of air horn
casting. Then plastic metering rod cam can be
removed.
No further disassembly of the air horn is required.